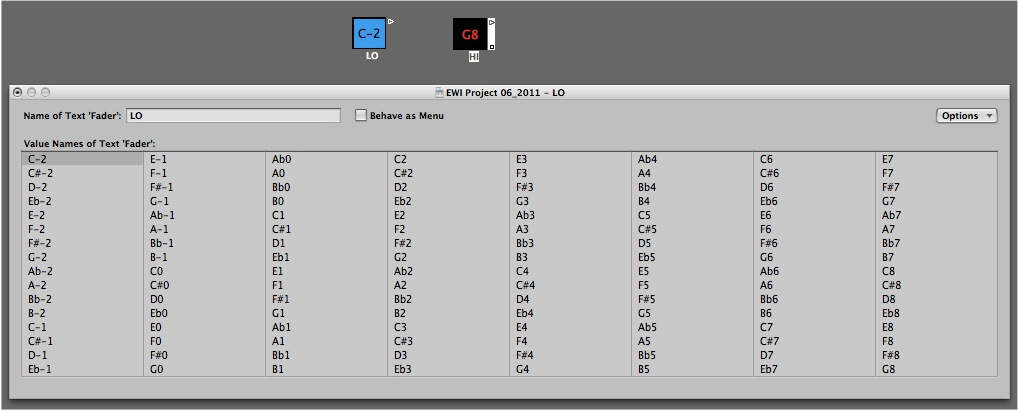
To continue with our environment, weʼre going to move into a little bit deeper water. Up until now weʼve created simple objects to control a single parameter with a simple on/off switch like interface. This week weʼre going to build a range limiting widget that will allow you to limit the note range your output destinations will react to. The standard range is C-2 to G8, 128 different pitches (Hmmmm… thereʼs that 127 number again!) which correspond with 00-127 in numerical range. Hereʼs how they relate:

Hereʼs what weʼre trying to create:

There are five objects in our RANGE LIMITER. A MACRO IN (1) that is where the input signal begins. Two FADER OBJECTS marked LO (2) and HI (3) that set the respective low and hi limits in the TRANSFORMER OBJECT (4) they are connected to, and last, a MONITOR (5) labeled MACRO OUT where our final signal leaves the macro when packed.
In many ways itʼs a very simple object. MIDI comes in the MACRO IN and passes to the TRANSFORMER which analyzes the MIDI data and allows whatever matches the parameters to pass through and filters out non matching information. The slightly advanced part of this, conceptually, is that weʼre going to use another set of objects – the FADERS (1) & (2) – to control the parameters of the TRANSFORMER (4). This allows us to only use one TRANSFORMER object but manipulate it as we need to suit our end goals!
To better understand how faders can control one another, take a look at this excerpt from the Logic User Manual:
Using Meta Events to Control Condition and Operation Values
You can control the values of any transformer conditions or operations by using meta events. Meta events are internal Logic Pro messages—their form is similar to MIDI controller events, but they have no MIDI meaning, they never leave Logic Pro, and they control internal Logic Pro parameters.
Like MIDI controller events, meta events have two data values: the first one indicates the type of meta event (49 to 127, but not all are used), and the second one is the event value (0 to 127).
Meta events 122 to 127 a ect transformer parameters.
• Meta event #127 sets the first (top) operation value.
• Meta event #126 sets the second (bottom) operation value (if available). • Meta event #125 sets the first (top) condition value.
• Meta event #124 sets the second (bottom) condition value (if available).
Note: Transformers can also process meta events, as long as they are not the meta events listed above.
Note that all numerical condition and operation parameters used (conditions not set to All and operations not set to Thru) will be a ected by the same meta event. The status condition and operation are not a ected by meta events.
If you want to set numerical parameters individually, or leave some fixed, use separate transformers in series.
Meta event #123 sets the transformer map position.
Meta event #122 sets the transformer map value for the current map position. (Use meta event #123 to set the position first.)
Note: You can use a transformer’s Map Set operation to create these two meta events simultaneously. When the operation status is set to Map Set, the Data Byte 1 parameter specifies the map position, and the Data Byte 2 parameter specifies the map value at that position. (A meta event #122 is sent with the Data Byte 1 value, followed by a meta event #123 with the Data Byte 2 value.)
You can create meta events with a fader object, you can transform MIDI events into meta events with a transformer, and you can add meta events to a MIDI region from the Event List. When you use a fader, set the Output definition to meta, then set the Data Byte 1 value to the meta event number. You can remotely control any fader by changing its Input definition, allowing you to use faders (as well as other transformers) to convert MIDI events to meta events for the remote control of transformers.
So using the above meta event numbers, we can control a transformer in pretty much any way we want.
Step one
We need to create our two controlling faders. Weʼll do this by going to NEW> FADER> SPECIALS> Transform Operation Par 1 and NEW> FADER> SPECIALS> Transform Operation Par 2. This will create two different faders that appear to be the same and actually are but for one significant difference. By selecting Transform Operation Par 1, weʼve created a fader that has its output set to METADATA, Channel 1, #125 which sets the first (top) condition value of any transformer itʼs plugged into. Our second choice, Transform Operation Par 2 is set to METADATA, Channel 1, #124 which sets the second (bottom) condition value of our transformer. Set them both to appear as text and then double click on the first fader to open up its definition settings like so:

You’ll need to enter the pitch names individually by hand, or if you can find a list like this one, you can copy and paste the list into the box using the commands under the Options menu in the upper right corner of the window. Do this for both fader objects. When you’ve completed this, make sure your faders are set to the parameters as shown here:
LO FADER

HI FADER

Notice that their settings are identical with the exception of the output Metadata data byte 1 number (125 & 124, respectively).
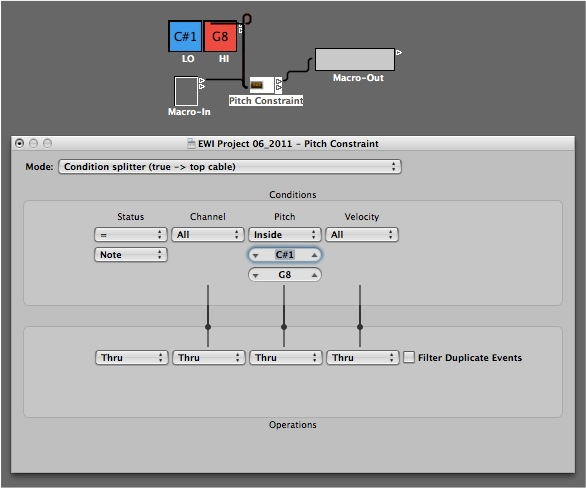
Once this is complete, you should then create a new TRANSFORMER object, by selecting NEW>Transformer. Connect the LO and HI faders to it individually (don’t connect them in series). Label the transformer something useful, like “pitch constraint.” Double click on the transformer to open its settings and set it as follows:

MODE: Conditional Splitter (true -> top cable) If the transformed MIDI signal meets the criteria, it will be routed out the top output cable. Otherwise it is routed through the bottom cable connection and in this case, since there is no destination for the second output, it is a dead end, so therefor has no output.
Status: Note -> Thru
Channel: All -> Thru
Pitch: Inside (top condition) (bottom condition) Here’s where the magic happens! The LO fader (META 125) control we created before controls the definition of the lower limit, setting the base range, whereas the HI fader (META 124) controls the upper limit setting the high range. By changing the values on the faders, you change the values of the definitions, limiting the range of notes that are output through the transformer.
Velocity: All -> Thru
Assuming you’ve set up your faders correctly and they are connected to the transformer, with the transformer window open, move either the LO or HI fader and you should see the top or bottom number in the conditional settings change. That’s it! You’ve successfully created a pitch limiter!
Create a new ORNAMENT object and label it MACRO IN. Create a new MONITOR and label it MACRO OUT. Connect the MACRO OUT directly to the TRANSFORMER in. Connect the TRANSFORMER out to the MONITOR in. Select all and go to NEW>Macro. Take your new range limiter and put it in the MIDI chain and try changing some of the settings with the note definition boxes. Play your EWI (or keyboard) and you should only hear notes that fall within the range you’ve established.
If all is working correctly, pack the Macro and you’ll wind up with a neat little package like this:

